It's been forever... Forever since I did artwork other than just plain pink. So with my birthday coming up soon, I decided to sit down and do some quick work. The boys were in bed at a decent time and the kitchen was cleaned up, so it was the perfect opportunity.
I did some messy roses and I wanted to incorporate anenomies because I think they are so pretty! Hard to make them look like something on a small scale though. But I still like how they turned out. I added some blue flowers and leaves to give it something extra.
Showing posts with label flowers. Show all posts
Tuesday, July 12, 2016
Friday, January 8, 2016
Floral Antlers
I got this idea because of a project I've been wanting to do. I have a bleached deer skull from the buck I got last year and I want to paint it black and paint flowers on it. I have yet to have to time, or skill actually, to do it yet. Someday!
The lines aren't very precise. I need a finer brush, but it's not bad. I might try smaller flowers with more of the skull outline next time.
I used Essie Marshmallow-base. Wet N Wild for the black. OPI colors for the flowers and added some OPI Super Star Status for some glitter.
Monday, November 16, 2015
Catching up a little
I haven't done much with my nails lately. So much going on with 2 toddlers! I can't believe they are almost 2 already! It goes so fast.
Here's just a few things I've done over the last couple months.
This is a quick one I did last night. Base is Essie -Marshmallow and the gold is Ulta
Candy corn gradient for Halloween. The ring finger is way more blended. It was the first one I had tried and I didn't quite blend the rest of them as well, but it makes it more candy corn like. All are SH colors topped off with China Glaze - Fairy Dust
This was my favorite! I was sad when this started chipping.
I did this one a few months ago. I liked the idea, but my black was getting thick so I couldn't quite get the swirls how I wanted them to be.
So there's most of what I've done lately. Here's hoping I can get some Christmas ones done!
Wednesday, January 21, 2015
Floral Stripes
Surprisingly I've been wearing just a solid color with a glitter top coat on my nails for the last couple weeks. I'll have to do it again so I can post them. The Rimmel Glitter Bomb top coat is my favorite so far! I decided I needed to do some art though.
As with the last time I did roses, I'm still way out of practice, so I just kinda blobbed some SC-VIP and added some Sally Hanson - White On lines. It needed a little something so I added a few stripes. SH-Sugar Coat is the pink and ELF-Blushing Beauty is the gold. The base is SH Triple Shine - Great White.
KH
Tuesday, October 14, 2014
Silver/Gray with flowers
Having a day off is so great! I still have a few household chores to do and babies to play with, but I also get some time to do my nails! :)
I'd seen a post once with gray and pink flowers. I can't remember what it was or where I saw it, but the idea has stuck with me since so this is what I came up with.
The last one is a little blurry... I think the topcoat was too shiny because it just wouldn't focus that well.
I'm WAY out of practice on doing roses. The pointer finger one is the best, but I just couldn't get it down for the rest of them. The base is Sinful Colors - Tantalize. It's has a slight shimmer and is pretty sheer with one coat, but I didn't want it too gray, so I just left it.The roses have a base of Sally Hanson - Sheer Ecstasy, then Sinful Colors - Captain's Delight and the white is Sally Hanson - White On. The darker gray on the little stems is elf - Misty Haze. I topped it with Sally Hanson - Instant Dry top coat. It works pretty well actually. It's very very shiny, almost too shiny, but I like it well enough.
KH
Friday, January 24, 2014
Blue flowers
Well, no babies yet. I'm considered full term for twins on Sunday but I'm really hoping I can make it to February. That's only a week-ish away, I think I can make it! Granted, I'm really getting uncomfortable and I'm carrying babies that are a little over 5 pounds each! That's a lot of baby! My ankles definitely feel it.
Onto nails. It has been awhile and my nails were getting so long. I had to cut them anyways, so I decided to do some simple flowers. I chose blue for the flowers just because it's different than my usual pink.
You can't really tell, but the base coat is actually a very sheer, minty green color. I used Sally Hanson-Sea. If I did more than one thin coat, you could be able to tell, but I didn't want to make it too green. I might try a more green base with blue flowers another time. My pink is running out, so I had to come up with another base that wasn't just clear, or plain white. So the flowers are in Sally Hanson-Rain Check, white, Sally Hanson-White On and the leaves are Sinful Colors-Beau Khaki. After trying to remember what names are of colors, I realized that I use a lot of Sally Hanson! Ok, that's all for now.
KH
Monday, November 4, 2013
More one stroke flowers
This weekend was pretty relaxing for me. We picked up some car seats for the twinsies Saturday morning and I spent the afternoon doing nothing! It was so nice. I had time to sit and do my nails and I decided that since it had been so long since I tried one stroke flowers, I would try again. Only one really turned out like what the pictures on the internet show, but that's ok. The rest turned out alright. I needed a smaller angled brush and I tried using a smaller straight brush, but neither worked that well. Guess I'll have to try to look up more nail art brushes one of these days!

The picture above is the one that looked more like how I wanted it to, and for some reason I was able to do it with my left hand!! Odd... but it's what I was trying for.
I was trying for the look like the one that actually turned out, but for some reason, I just couldn't get it to work right. Like I said, it could have just been that I needed a better, smaller brush. I would rinse it off in nail polish remover after almost every flower. I'm sure that is the wrong thing to do because the brush would get really stiff and would just smear colors instead of painting them on nicely. Oh well, maybe the next time I try they will look better. Oh I used Sally Hanson- Champagne Toast as the base (two coats) and the flowers were done in elf- Red-y or Not and Sally Hanson - White On. I can't remember what the leaves are... Sinful Colors - something...
Tuesday, October 15, 2013
Fall Flowers
Hi all. Well my pink and blue hearts from last week should have been just blue hearts. Guess I will be having two boys! I was a little disappointed, but I still already love my boys, even if I will be outnumbered!
I had some time yesterday to sit down and do nails again.This look didn't take very long at all actually. I wanted to do some flowers, but make them more fall-ish. So orange and yellow seemed to be the best choice! I couldn't decide what hand looked better, but I think I like my right hand better...
You can't really see it, but after the base coat, I did a little bit of a gold gradient. I should have gone up a little higher with it, but since the base is already shimmery, it's hard to see the gold...
Base was Sally Hanson-Champagne Toast. Gold gradient-ELF Blushing Beauty. For the flowers the yellow is Sally Hanson-Mellow Yellow mixed with S.H.- White On. The orange is Wet n Wild-Sunny Side up mixed with White On. The brown centers is ELF-Smokey Brown and the leaves is Wet n Wild-Sage in the City.
KH
Wednesday, September 18, 2013
Roses and an update
Wow, it has been a really, really long time since I've done my nails. I've had a good reason though. I'm expecting TWINS in February!! I'm a little over 4 months along, 17 weeks 3 days to be exact. So the last couple months have been kinda rough between just being busy, and being nauseous and sick ALL THE TIME! I'm really hoping that phase has passed. I still have nausea in the morning, but it's not all day like it used to be. Thank goodness!
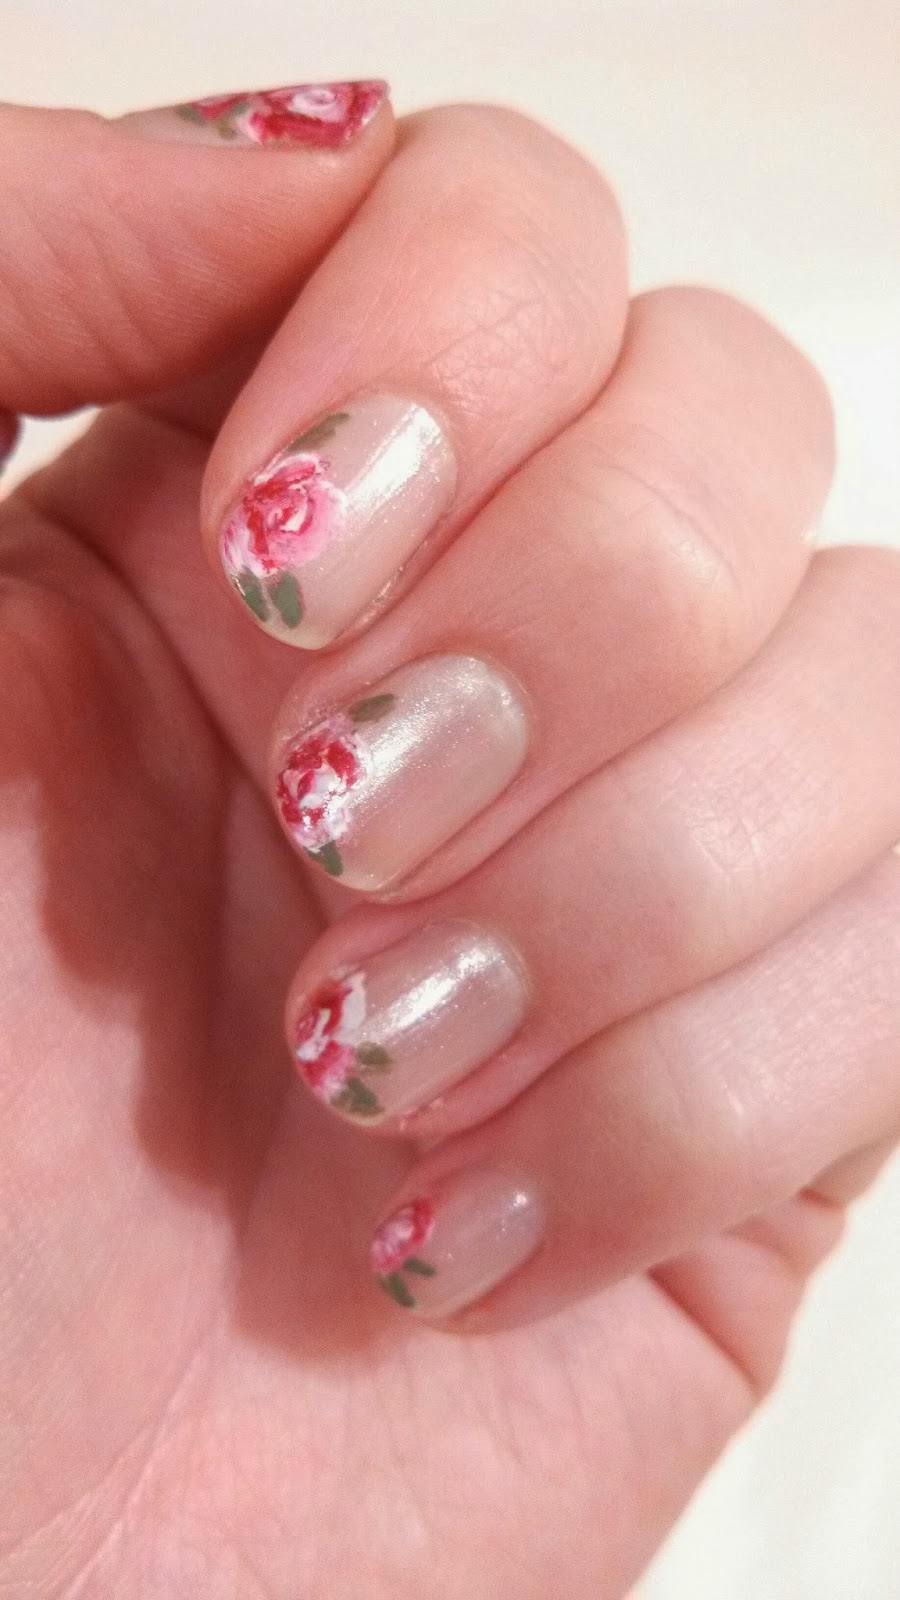
Well there is the update part, now to the nails. I decided to do these little roses because, well, who doesn't love flower nails! They are my go-to. And for it being the first time doing nails in months, I wanted something I knew I could do. They aren't perfect by any means. That's what happens when you don't practice, practice, practice!
I started with a base of Sally Hanson - Spun Sugar. I made the pink for the roses with elf-Cherry Bomb and mixed it with Sally Hanson - White on White. The darker red/pink is Cherry Bomb. I did the leaves with a Sinful Color polish and did some outlines with a Sally Hanson black.
They turned out ok for having not done nails in forever. The petals aren't as sharp and defined as I'd like them to be. From a distance they look fine! :) The pointer and middle finger are the best in my opinion. I'm hoping to try to get back on track and do my nails at least once a week. We'll see how that goes...
KH
Friday, June 14, 2013
Been Awhile! Gradient Nails
It has been a long time since I did my nails. Summer comes around and I just get busy. So summer nail art is always sporadic. But last night I decided it was just time to do my nails. I wanted to do a gradient since I have only tried it once and I did really like how it looked. So I decided on a pink and gold gradient and had to add some flowers because I just love flowers!
For the flowers, I tried for one stroke petals, but it didn't work out exactly as I had planned. But I still like them.
For the base, I used my favorite pink, Sally Hanson - Sugar Coat. For the flowers I mixed elf - Cherry Bomb and Sally Hanson Extreme Wear - White On. The gold was elf - Blushing Beauty. Hopefully I can get to my nails a little more often. I almost forgot how fun it is to create pretty nails!
Thursday, May 9, 2013
Bright flowers
I didn't really know what to do for my nails. I wanted something pretty, but quick and easy. Que the flowers, my go-to art. These are simple flowers made with a dotting tool ( that didn't work like I thought it would). But they are fun and springy, like the weather finally!
I thought my dotting tool would work more like the end of a bobby pin ad make nice little circles. I guess the one I have it for pretty tiny dots or something because it didn't work that well. I had to really get a lot of polish onto it so my little flowers aren't perfect. But I still like them! I used a Sally Hansen quick dry for the the base. I think it's White on White maybe? I'm so bad at remembering the names. Then I added all the dots, starting with the petals and doing the centers last, all with Wet 'N Wild polishes. For the leaves I used two different colors. I started with the darker green, Sinful Colors is the brand I think, then I added a dot of a minty green, another Sally Hanson. I really like the contrast on the leaves. I think I'll use a creamier white next time though.
KH
Thursday, April 25, 2013
Flowers!
Here is more flower nail art! I just love doing flowers. Some flower designs are hard, but some are really easy like when you are doing small clusters of flowers. You just do some dots and and some lines, easy!
I do really like how this turned out. I wish I had some more shades of pink though. This is actually red and white swirled together.
I started with my favorite pink basecoat (it's Wet 'N Wild - Sugar Coat) I added three dots of red (no name, it is a very old nail polish that I found) and a dot of Rimmel - French Tip white to each of the red dots and just swirled them together. Since they are such small flowers they don't have to be perfect. When I do bigger swirl roses, I try to add more petals and whatever they need. Next I added some blue (I don't remember the name) dots and the green leaves highlighted with a stripe of darker green (again, don't remember the name) I'll update later. Hopefully I have some time to do my nails this weekend!
KH
Thursday, March 21, 2013
Watercolor Nails
Busy, busy, busy! I finally had time to sit down and paint my nails last night! I've seen this watercolor method and really wanted to try it with pastel colors. The only problem with that is that is doesn't show up in the pictures very well. Probably because I use a phone for picture taking! :) Either way, I like how this turned out but my right hand looks better than my left. Weird since I'm right handed, but I'm always more careful when I use my left hand so the designs look better sometimes.
I used a sheer white basecoat then added a top coat. I read somewhere that doing that will protect the basecoat from getting ruined when you watercolor with the acetone. I started with pink blobs of polish and used a paintbrush dipped in acetone to fade out the color. I added a minty green (which you can't even see really), a bolder white and a little turquoise-y blue. It looked fine by itself, but I thought it needed a little something else so I added some white watercolor looking flowers. That was the hardest part actually!
My basecoat was a little too thin. You can really see my nail line on some of them.
I tried to get a good picture of how the colors look, but I just couldn't get the picture to capture it properly. In person you can really see the pinks and blues better. Oh well, I'll have to try this again with darker colors maybe.
KH
Monday, March 11, 2013
One Stroke - Pink
I wanted to try one stroke flowers/roses again because I really like the look of it and practice makes perfect! This is definitely not perfect and it doesn't really look like one stroke, but I like how the colors blended and I loved the pink rose with gray leaves look.
I started with a creamy white basecoat (two coats) then attempted one stroke roses with red and white. They turned out looking a little more like peonies! I used two colors of gray for the leaves and added a little bit of silver sparkle to the leaves and a little to the roses. Like I said I really like the look of the pink and gray. Its just something a little different look, rather than going with regular green leaves.
KH
Thursday, February 28, 2013
Spring Flowers
I decided it was time to do something a little more springy. So, no gray nails! I've seen ideas where people use white as a base coat and I've always wanted to try it. This is a creamier white so I think that helps. I don't think I would do a really white base coat.
I really like how it turned out. For the flowers I just kinda did some random dots with red and added a light pink over the top to tone it down a little then added some white lines and swirls. There is also a few gray dots (and I said there was no gray, oops!) I had a light blue for some dots, but they didn't show up very well so I layered a darker turquoise color over it. And of course, there are a few leaves scattered around. I could have done a little more detailing on the blue flowers, but it was getting late. I'm sooooooooo happy that I found some Seche Vite top coat. My nails are dry so fast! I used to use clear polish for a top coat and that would take FOREVER to dry and since I do my nails at night I would have to stay up even later to make sure they were dry enough so I could go to bed!
The cleanup is better this time too! And I'm so happy my nails are short again!
KH
Tuesday, February 26, 2013
One Stroke Flowers
This is my first attempt at one stroke flowers. It isn't perfect, but I think I did ok. It's a lot harder than I thought! Plus, I think I needed a smaller brush, or maybe just a different one.
I really like the black/white/gray color combo. The dots along the french tip really helped too. Overall, I like the outcome (minus the bad cleanup. Oops!) I will be doing more practice on this though. The videos I looked up for help looked so pretty! I'll get there!
KH
Monday, February 25, 2013
Flower tips
You'll notice that I do A LOT of flower nail art. I just really like how they look. This is kind of like a flower french tip, but with bigger flowers. I decided to do the leaves in black just to give it a different look.
Since this, again, is an older picture I didn't have a better one. If you look closely you can see that I did the base in a really light shimmery pink. The flower base is white with another light pink in the center of the petals. This is one of my favorites so far!
KH
Thursday, February 21, 2013
Pink and Gold
I thought about posting some more of my older work, but since I took all the pictures with my old phone, they look really blurry... Which is sad because some of them I really liked, so I'll have to redo them later. For now, I'll have to post more recent stuff.
This is the first nail art I did when I finally received a set of nail art brushes! Best day ever! I didn't clean up very well, but I think the overall outcome turned out really well.
I tried more realistic roses and started with a light pink and had to mix the pink with a drop of red for the outline of the petals. You cant really tell what the gold is but it's kinda like leaves/filigree. ( I don't have names of colors right now because I don't remember them...) But that's all for today! Sorry for the terrible lighting!
KH
Subscribe to:
Posts (Atom)